Sunday, November 30, 2014

How to make your house comfortable with minimal fuel consumption

Tomorrow it will be December, but for the past month my house has remained a comfortable temperature even though I've yet to turn on the gas to the furnace this season.
My house is now at 70 deg because I baked some pumpkin pie filling for an hour. The inside of my house has been reaching daytime temperatures of 68-71 deg this past week, depending on how sunny it's been (or not) and how much baking I've been doing. 

It's past 9 PM and I'm sitting here with just an apron over my silk shirt, not even needing to wear a sweater. It's 59 deg F outside, not normal for December eve. 

Friends have asked me how I've made my house (built in 1972) so comfortable even without the furnace operational. I meant to share all the details long ago, but here's the brief, simplified explanation of how I did it.

1) I don't have an overly large house to begin with. Our house is assessed at 1,050 square feet. It's a single story townhouse, an end unit with one shared wall.

2) While in college I was an intern at the Southface Energy Institute where I received hands-on training how to make houses energy efficient. I do have a degree in engineering, but it's not rocket science. Just a few things to be cautious about when retrofitting so that you don't create a fire hazard or put the structural integrity at risk.

3) A few months after moving in, experiencing a hot spell in May in which our house became nearly uninhabitable, I discovered that our attic only had a couple inches of insulation. So I fixed that in a hurry. That deserves a detailed blog post in itself.

4) Over the next several years, I sealed and insulated the ducts in my attic, added more attic insulation, blew insulation into my walls, and replaced our single-pane aluminum frame windows with double-paned ones. 

I did much of the work myself and with the help of a friend and at times some inexpensive hired help, except for the window installation. I'm told that window replacement is easy, but that's one project I was happy to pay professionals to do.

5) Weather-stripping makes a huge difference. This also deserves a more detailed post. 

6) Much later, I also installed radiant barrier in the attic, but that mostly helps with keeping the house cool in the summer rather than warm in the winter, I think. 

7) I had a large piece of plexiglass that I'd inherited from my folks, which my neighbor helped me trim to fit in my front doorway. I drilled some holes to put handles on either side. It's too short for the doorway so I stuff some foam padding in on top when I have it placed there. Because I have a south-facing front door, the plexi lets me turn my entryway into a low-tech passive solar collector when the sun is low in the sky, as it is in the fall, winter and spring. Even a half hour of partial sun can increase the house temperature by two degrees F.

All in all, I spent maybe $1,200 on materials, $1,000 on labor, plus $5,500 on the window replacement. Plus about 2-3 months of my life spread out over a decade. But now I have a super comfortable house with utility bills that average $25/month. I don't let the house get colder than 63 or 64 deg overnight. The day that I can't get my house to at least 66 deg during the day is the day I turn on the furnace for the season. We have a solar hot water preheater installed, but no solar PV yet. The furnace is the original 80% efficient one installed in 1972.

I also ripped out the wall-to-wall carpeting and had cork flooring installed. That helped the house be better insulated from the cold concrete subfloor also. But the biggest difference came with the attic insulation.

During that process I also put in backer rod at the bottom of the wall behind the baseboard and sealed with acoustic caulk. My house now fends off insect invasions as well. Unlike most people around here, I leave food out in the kitchen all the time and do not have any ant invasions. I have many fewer spiders, cobwebs, or creepy crawlies than I used to. And I don't use any poisonous traps around my house at all.

Very recently, I had the asbestos tile and icky vinyl removed from my kitchen floor. Then I put down a paper floor over a layer of cork-rubber underlayment. That deserves a separate blog post as well. Anyway now I have a very comfortable, artsy, insulated and functional kitchen floor. I love it. And it probably helps keep the heat in a smidgen.
Friday, August 21, 2009

sun tunnel


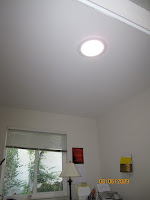
Our den has only a north-facing window. Since the plan was to start using it as an office, I decided to get a sun tunnel installed to bring more light into the room.

Several years ago, I had gotten one installed in each of our windowless bathrooms and they had transformed those rooms from pitch dark, icky places to wonderful alive spaces where I could put houseplants.

The only sun tunnel company in my area still in business with a valid license is Sunlight Concepts which sells the Solatube. Solatube recently started selling a new energy-efficient model that qualifies for the federal tax credit.

It took the installer 2 hours to install the sun tunnel. I had to get a permit this time because my city recently started requiring one for these sun tunnels. I also arranged for the installer to fix the opening in my roof to properly vent the new bathroom fan I had installed the previous week. The old fan had a 3" vent pipe, and the new fan required a 4" vent, for which I used 4" insulated duct. But the roof jack needed to be adjusted to accommodate a 4" connector, as it was poorly situated with some joists partly blocking the opening. Until he fixed the connection I forbade my husband from showering in that bathroom, as I didn't want to be dumping moist air into the attic instead of out through the roof.

The installer was quick. Maybe a little too quick, because he didn't nudge the insulation back against the Solatube. So the area around it in the ceiling got really hot when the attic heated up. I had to climb back into the attic to fix that.

Pictures are of before and after installation. It did make a big difference to how that space feels, although not as dramatic as for the windowless bathrooms. All told, it was under $700 to get this suntunnel installed. A great deal.

A better bathroom fan


This year the house is getting a total makeover. At the beginning of this year my husband wanted to buy a bigger house to accommodate space for his hobby, which requires a large space for motion capture video. After he looked around some he came to realize, which I already knew, that our existing house is hard to beat for livability. It's in a quiet but convenient location and laid out very efficiently to maximize use of its 1000 sq. ft.

He figured out that he could make our garage work for his purposes, so no need for new house. However, we're moving everything out of the house to replace the wall-to-wall carpet with cork flooring. When we move back in, we're going to reclaim our master bedroom as a bedroom and use our den as our office.

The master bath had a 2.5-sone, 50-cfm (cubic feet per minute) ventilation fan that I had installed in 2003 to replace a very noisy fan that was there before. While quieter, this fan was not nearly as quiet or efficient as the very best fans on the market today. I decided that the master bedroom would become more livable if I put in a really quiet fan that ventilated better.

After a bunch of research I found a great fan by Panasonic sold by R.E. Williams Contractor. It's 80 cfm, and only 0.5 sones. It's designed to run all the time at a lower air flow (at 0, 30, 50, 60, 70, or 80 cfm), then kick on at a higher air flow when someone enters for a set period of time. I set mine to be zero cfm when unoccupied and to run for 20 minutes at 80 cfm when occupied.

That it kicks in automatically means that there are no issues with odors leaking into the bedroom when the occupant of the bathroom forgets to turn on the fan.

At first I wired it so that you couldn't turn the fan off, but my husband complained that he wants the fan off while he showers so that he doesn't get cold. So I put it on a switch so that he could turn the fan off when he's going to shower and then turn it back on when he's leaving the bathroom. The fan automatically shuts off after running for a set period of time that you set with a dial inside the fan.

It took me all day to install the darn thing. The mounting instructions were complicated to figure out. But after I read through the many different mounting options at least a dozen times while puzzling over the different possible pieces of mounting hardware, I finally figured out the method that worked best for my situation. It required dissassembling the fan to remove the blower assembly from its housing, to make the unit lighter and easier to manipulate for mounting.

I had to cut a bigger opening in my ceiling and take a dremel to remove a nail sticking out of a joist that was left over from the original fan installed in the house. Fortunately, I was able to do most of the installation work in the bathroom from below the opening of the ceiling, because it was deadly hot in the attic.

And then, after having had several previous successful efforts to rewire other bathroom fans to accommodate new types of switches, I was careless in figuring out the wiring this time and blew out our house circuit breaker. We almost had to replace it, but after it cooled down it started working again.

This time, carefully checking with our multimeter I finally figured out the correct wiring configuration, and it worked.

But then my husband said he wanted to be able to switch the fan off, so I swapped out the single button light switch to a double button switch (for light and fan) and had to rewire the whole thing again, completely differently. Good thing I have an engineering background and can do wiring diagrams in my head. A fun mental challenge.

When the fan is on, the sound reminds me of being in a hotel room in a highrise that has the ventilation on all the time, i.e. it's basically background noise, fairly quiet. The fan has an occupancy sensor to automatically kick on when someone enters the room. I'll try adjusting the "occupied" setting to run at 50 cfm for 30 minutes to see if the noise level goes down to where you have to strain to hear it. The fan has a little green light that flashes on when it is detecting you, as you can see in the picture.

Monday, March 30, 2009

Update to "Who Needs a Heat Gun?"

Heat shrink tubing apparently doesn't need high heat to shrink. So the magnifying glass technique worked. But when I tried to use a magnifying glass to melt a plastic lid (#4 plastic I believe) it didn't work. Not hot enough.

Tuesday, December 30, 2008

Who needs a heat gun?

I had some heat-shrink tubes to shrink around a connector for the wiring for lights my new bicycle, but no heat gun. Since I almost never need to use a heat gun, and didn't want to spring for the expense, and was too shy to ask my handy neighbor if he might have one that I could borrow, I wondered if it might be possible to use an ordinary magnifying glass to concentrate the sun's energy on the tubing and thereby shrink it.

Not owning a magnifying glass either, I purchased a $4 folding one from the local drugstore, which was about 2 inches in diameter, so not terribly large. I figured, if my idea didn't work I'd still use the magnifying glass when I got older and my eyesight deteriorates.

About 2 pm on a sunny and somewhat cool fall afternoon, I wheeled my bike out into the sunlight and angled the magnifying glass to focus the sun's rays on the heat-shrink tubing. I held the magnifying glass toward the sun a few inches from the tube and moved it around until I could see a bright spot of light focused on the tubing.

To my amazement and glee, it worked like a charm. In fact, I was worried it was working a little too well because I could sometimes see wisps of smoke coming off of the tubing. I rotated the wire around and up and down to get the tubing shrunk all the way around the connector and kept the connector moving so as to not let any part overheat and catch fire.

I'd never played with magnifying glasses as a kid, nor ever used a heat gun to shrink heat-shrink tubes. So it is hard for me to compare the actual experience with that of using a heat gun, but in any case, my scheme worked. The tube shrunk quickly before my eyes, and made a tight seal against the connector. It took a minute at the most to get the whole job done.

It was neat to harness the sun's energy in this way. It definitely underscored for me the power of the sun and the danger of letting kids play with magnifying glasses. I was smug with my own ingenuity at saving money and not having to find space to store yet another large and seldom-used gadget at my house, which would have been the case if I'd gone out and bought a heat gun. I felt like a super environmentalist, not having to use electricity, doing what many folks might not have thought possible, etc.

Tuesday, April 29, 2008

Fixed my toaster -- how I did it


Our Rowenta toaster broke. When you pushed the lever down it wouldn't stay down; the toast would pop back up. I would have to hold the lever down the whole time to get toast.

This is the story of my toaster triumph. How I managed to fix my broken toaster for under $5 and in under an hour. Hopefully this will help others with the same predicament.

I wanted to fix the toaster rather than throw it away and get a new one. Wanted to be kind to the environment and save money. Thought of all the landfill space the toaster would take, all the minerals mined and oil pumped that went into making the toaster, and the people whose quality of life might have been negatively impacted by the pollution from that process.

I called a few appliance repair shops. They either said I was silly for not buying a new one or else wanted $45-50 to fix it.

My toaster has the traditional dial-knob and lever. If you have the new-fangled $150 electronic ones that don't have knobs or even levers, that are computer-controlled with little buttons you press, basically you need to get the PC board replaced at an authorized service center for $50. Knowing that now, I think I prefer the old style.

My Rowenta toaster is a model TP-5, I think about 10 years old. The manufacturer doesn't sell parts for it anymore. As it turns out, the parts weren't broken. Rather, all I needed to do was open it up and clean off the contacts and voila, it was fixed.

The bottom of the toaster has 3 torx-head screws. I biked over to Sears with the toaster and figured out I needed to buy a size 10 Torx screwdriver for $3.99 plus tax.

At home, I took the screws out. I removed the rotating dial that specifies how brown you want your toast by pulling it straight out away from the toaster. I also removed the lever that you push on to put the toast down, by firmly pulling it away from the toaster in the same direction I pulled the knob to get it off.

Then came the tricky part. The inside still wouldn't disengage from the outer white plastic cover. I ended up having to hammer down on four pointy plastic bits that were jammed through little holes in the bottom plate, in the process breaking off 3 of them, as well as work on prying the plastic cover from the metal plate off with screwdrivers. No sweat about the broken plastic pieces, since they weren't critical in holding the cover on -- still had those 3 screws and some other retaining tabs along the edges.

I inspected the innards and found that the underside of the metal plate that comes down when you push the lever to get the toast down, had a thin layer of sticky brown goop on it. No doubt that it came from some piece of bread that had gotten lodged there one time when I was shaking the toaster around to get the crumbs out in addition to pulling out the crumb tray. I think this is why the manufacturer advises against shaking the toaster upside down and so forth, but rather recommends just pulling out the crumb tray and keeping the toaster level. I'd messed up my toaster by ignoring that advice.

The part that the metal plate contacts, which looks kind of like a bunch of staples stacked together, also had a very thin layer of goop on it and was a bit rusted. This part is magnetized when you plug in the toaster and get electricity going to the solenoid when you push down the lever, thus holding down the lever. I cut a small piece of medium-fine grit sandpaper and sanded away the goop.

For good measure, I also lightly sanded the other contact points for the copper strips that move and make contact when you push the lever down. I also vacuumed away most of the crumbs using a mini-vacuum attachment that you use for cleaning computers.

I reassembled the toaster, plugged it back in, and voila, working toaster, practically as good as new. No replacement parts were necessary, just cleaning the contacts.

If you are having problems with controlling the toasting level, you probably have a bad thermostat. It is an inexpensive part but does require some soldering to replace. The other part that can go bad, apparently, is the solenoid. In really cheap toasters it seems the parts do go bad. We received the Rowenta as a gift from my in-laws and I guess it is a quality toaster where the parts hold up. It was not the toaster per se that was at fault, it just required a little cleaning.